All Categories
Featured
Table of Contents
- – Rv Couch Pomona, CA
- – OCRV Center
- – Rv Microwave Replacement Pomona, CA
- – Rv Sofas Pomona, CA
- – Rv Couch Pomona, CA
- – Rv Dinette Table Pomona, CA
- – Rv Dinette Table Pomona, CA
- – Replace Rv Flooring Pomona, CA
- – Awnings For Trailers Pomona, CA
- – Awnings For Rv Pomona, CA
- – Rv Sofas Pomona, CA
- – Rv Couch Pomona, CA
- – OCRV Center
Rv Couch Pomona, CA
Just like the home windows in your car or home, there are a couple of different kinds. Possibly you want a home window in your door to ensure that you can allow in the sunlight? Check! The Recreational Vehicle Access Door Obscure Glass Home window is excellent for that, with the enhancement that you can have your personal privacy while still allowing the light.
And if you want your windows to be tinted, we can help you there. So you can have the sight, the sun, and the wind, all while having the privacy you desire. I make sure you know all that a window can do. It allows in light, it stays out rainfall, lets in a breeze, maintains out pests.
Without the home windows to let in the light to inform you whether it's night or day, you can get all type of blended up, maybe also miss a huge occasion. Or imagine you're having a cookout with your household and you run inside to obtain some more hot canines. Without a window, you wouldn't be able to see that your daughter is getting terribly close to the fire and no one else has discovered.
Rv Microwave Replacement Pomona, CA

The sunlight is a terrific designing device to utilize, brightening room and aesthetically broadening it. All the most effective decorators understand exactly how much of an influence illumination can have. Whether you're using it to accentuate a remarkable piece of artwork or include heat to a whole room, lighting makes all the difference in an area.
If you have older home windows that require changing, the process for setting up the new windows isn't as easy as it looks. You require to get rid of the internal structure of the old window by getting rid of the screws. You need to eliminate the outer frame of the window by pushing it out of the home window area.
When your location is tidy and cost-free of debris, check the structural parts of the window opening (Awning Installation Pomona). If there is anything that needs fixed (rusted staples, for example), make sure you repair them prior to setting up the brand-new window.
Again, make certain you are utilizing the help of one more person to maintain whatever straight and even and prevent the window from dropping. When the outer framework and the glass framework remain in location, protect them by positioning and protecting the inner structure on the within the window location.
Rv Sofas Pomona, CA
Our team believe in offering the absolute best worth, high quality, and choice (Awning Installation Pomona). And also, we want you to appreciate your acquisition! In case you wish to send out an item back to us, you may return most unused items for a refund or exchange, minus delivery, within 90 days from the date of purchase unless kept in mind listed below under exemptions and exemptions
A return permission will certainly be given, and, in every case, we'll begin to maintain an eye out for your return. For internet orders returned in-store, please take the item in original product packaging, along with the invoice to any kind of Outdoor camping Globe retail areas for a refund or exchange.
Rv Couch Pomona, CA
Reimbursements for web orders provided in-store have the ability to be reimbursed to a PRESENT CARD or SENT BY MAIL CHECK ONLY; some exclusions may use. For retail acquisitions returned with a receipt, please return the extra and unopened item, with the initial sales receipt, for a full refund or exchange. All returns with a gift invoice will certainly obtain an installment plan for the quantity of the thing at the time of purchase.
When it comes to Motor home traveling, having the appropriate windows can make all the distinction. Whether you're looking for much better insulation, enhanced air flow, or simply a far better sight, there are a couple of essential variables to take into consideration when picking the best Motor home home window for your automobile. Here are 5 tips to aid you make an educated decision and appreciate your trips to the maximum.
Rv Dinette Table Pomona, CA
Fixed home windows are fixed and can not be opened up, while sliding home windows can be opened up flat or vertically. Awning windows are pivoted on top and open external, providing superb air flow. Consider the type of home window that will finest fit your demands and choices before buying. When picking a recreational vehicle window, it is very important to try to find top quality materials and building and construction.
Seek windows that are made from tempered glass, which is more powerful and extra immune to damage than regular glass. Additionally, the structure ought to be made from sturdy products like aluminum or vinyl, and should be developed to stop leakages and drafts. Investing in a top quality recreational vehicle home window will make certain that it lasts for years and offers reliable performance on your trips.
The home window ought to fit comfortably right into the space provided, without any type of spaces or rooms that can enable drafts or leaks. Measure the opening very carefully and select a home window that matches the measurements. Additionally, take into consideration the shape of the window and how it will certainly fit with the total layout of your recreational vehicle.
Rv Dinette Table Pomona, CA
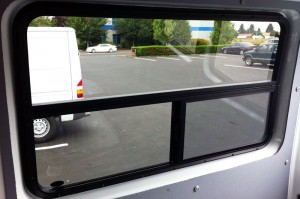
Your recreational vehicle's windows are the secret to enjoyable camping, letting you see all the sights of the roadway and your locations. If you're driving a motorhome, the windscreen is one of the most essential window on the entire RV. No matter which type of RV you own, your windows are a fundamental part of camping.

Older Recreational vehicles were developed with less innovative window systems, so there is wear and tear that may be obvious., but particular problems like fog, scratches, or concerns with the covering of the home window may indicate it's time to change your Recreational vehicle home windows.
There are splits, deep scratches, or contribute the windows. The home windows are no more snugly sealed. Wind or water enters the gear from around the windows, also when the windows are closed. Your windows aren't properly protected. Your windows rattle when the motor home remains in movement. Wondering if it's time for a recreational vehicle window replacement? Get in touch with your local Lazydays motor home dealer to get more information concerning our home window substitute and RV glass fixing services! When replacing your motor home windows, you're able to select the right home window for your motor home and your demands.
Replace Rv Flooring Pomona, CA
There are likewise options such as transparent glass, pebbled windows, and colored motor home windows. Your design, protection, and window utilize needs will certainly aid figure out which kind of recreational vehicle home window you select. Your recreational vehicle's home window structures incorporate the interior and exterior components of your motor home, and they should be appropriately mounted to make certain that the sidewall's seal remains water tight.
The most effective method to make certain that your recreational vehicle window replacements are installed properly is to leave it to the professionals. Our motor home solution experts can change any type of windows and glass on your recreational vehicle, consisting of the windscreen, side windows, and even the extra complicated RV door home window substitute. Door home windows, if not mounted effectively, can rattle when you're utilizing the recreational vehicle door, so leave that repair work to our specialists at Lazydays RV.
Awnings For Trailers Pomona, CA
These home windows open outside with a crank mechanism, enabling for ventilation while reducing rainfall access (Awning Installation Pomona). Typically bigger windows that do not open, supplying unhampered views and light if equipped. Before we study the operation of RV windows, it's important to recognize exactly how they are set up. Right here's a short introduction of the elements associated with a common home window setup: The main glass system.
Supplies a watertight seal around the window. While Recreational vehicle windows differ from property home windows, they need regular attention and upkeep to prevent issues like water leaks.
Awnings For Rv Pomona, CA
See to it to inspect for room-by-room screen elimination as needed. To guarantee the durability and efficiency of your recreational vehicle windows, think about the complying with suggestions: Check out the location where the window fulfills the wall surface for any spaces or spaces. Tidy the location completely before using silicone sealant. In severe situations, you may need to eliminate the home window and reinstall it making use of putty or foam seal.
We encourage users to validate the contents and talk to their dealer or Keystone RV for the most present details. If you have any kind of questions or need more explanation, please do not think twice to call your supplier or get to out to Keystone recreational vehicle directly.
For those of you that are a lot more aesthetic, you'll value our step-by-step tutorial video clip, ingrained listed below. If you like the composed word, the steps are laid even more down the web page. Or appreciate both! These are the tools we needed for our camper window substitute. Depending on your motor home, you might or may not require every one of these devices for your job.
No matter where you purchase your brand-new Recreational vehicle home window, you'll require to offer precise measurements. Allow's damage down our process for gauging a Motor home home window for replacement.
Rv Sofas Pomona, CA
Do not put any type of outward stress on the window while taking your measurements, or it could come loosened and loss. For added safety and security, you might intend to have an assistant on a ladder outside, holding the home window in place while you measure. Meticulously eliminate the framework of your old home window to make sure that you can measure the opening (NOT the window itself).
For our rectangle-shaped window, we needed to take just four dimensions. Be conscious that we're measuring the opening itself. Utilizing a measuring tape, take mindful note of the width and height of the opening. It's an excellent idea to take measurements at several factors so you have an idea of just how easily the home window opening was reduced.
Rv Couch Pomona, CA
Next, determine the density of the wall surface (deepness of the home window), from the exterior wall surface to the indoor wall surface area. For this measurement, utilize your ruler (with dimensions that run right throughout). Put the ruler right into the wall surface until it touches the exterior of the window structure.
Measurements of the old home window and the window opening are frequently various. Home window manufacturers utilize filler strips to maintain the window level and snug.
Measure two times, cut as soon as? Take your time to obtain an exact measurement, and confirm it by determining a second time. Exact measurements are essential to recreational vehicle home window substitute. You do not want to freely gauge and round up or down. Always determine to the closest 1/16th of an inch. Take a close consider your tape step and make certain you recognize which are the 1/16th-inch measurements.
OCRV Center
Address: 23281 La Palma Ave Yorba Linda, CA 92887Phone: (714) 909-1444
Email: art@ocrvcenter.com
OCRV Center
The home window producers are the ideal authorities on installing their items. The manufacturer of your new RV home window has most likely included practical guidelines or tips to make the installation much easier. These kinds of guidelines are usually included on suppliers' sites. If your new window included guidelines in the bundle, make certain to keep those convenient, as they may have detailed step-by-step instructions in a consisted of pamphlet.
Rv Chairs Pomona, CARv Refrigerator Replacement Pomona, CA
Rv Couch Bed Pomona, CA
Replacement Rv Refrigerator Pomona, CA
Rv Sofa Beds Pomona, CA
Rv Replacement Awnings Pomona, CA
Rv Dinette Booth Pomona, CA
Replacement Windows For Campers Pomona, CA
Rv Carpet Installation Pomona, CA
Replacement Rv Refrigerator Pomona, CA
Rv Interior Remodel Pomona, CA
Replacement Windows For Campers Pomona, CA
Rv Floor Replacement Pomona, CA
Rv Couch Pomona, CA
Replacement Rv Windows Pomona, CA
Rv Interior Furniture Pomona, CA
Replacement Windows For Campers Pomona, CA
Rv Couch Pomona, CA
Rv Restoration Companies Pomona, CA
Awning Installation Pomona, CA
Rv Carpet Installation Pomona, CA
Rv Interior Remodel Pomona, CA
Rv Restoration Companies Pomona, CA
Motorhome Carpets Pomona, CA
Rv Sofas Pomona, CA
Rv Sofas Pomona, CA
Rv Carpet Installation Pomona, CA
Rv Carpet Installation Pomona, CA
Replacement Windows For Campers Pomona, CA
Rv Carpet Replacement Pomona, CA
Rv Interior Furniture Pomona, CA
Awnings For Trailers Pomona, CA
Rv Couch Pomona, CA
Rv Floor Replacement Pomona, CA
Rv Couch Pomona, CA
Rv Couch Pomona, CA
Rv Upholstery Pomona, CA
Replacement Windows For Rv Pomona, CA
Rv Floor Replacement Pomona, CA
Replace Rv Flooring Pomona, CA
Rv Couch Bed Pomona, CA
Rv Sofa Beds Pomona, CA
Replacement Windows For Campers Pomona, CA
Rv Microwave Replacement Pomona, CA
Rv Floor Replacement Pomona, CA
Awnings For Trailers Pomona, CA
Rv Carpet Installation Pomona, CA
Awning Installation Pomona, CA
Rv Couch Bed Pomona, CA
Rv Interior Furniture Pomona, CA
Motorhome Carpets Pomona, CA
Rv Carpet Replacement Pomona, CA
Rv Sofa Beds Pomona, CA
Rv Couch Bed Pomona, CA
Replacement Rv Windows Pomona, CA
Rv Replacement Awnings Pomona, CA
Rv Floor Replacement Pomona, CA
Rv Sofas Pomona, CA
Awnings For Trailers Pomona, CA
Rv Sofa Sleeper Pomona, CA
Rv Restoration Companies Pomona, CA
Rv Sofas Pomona, CA
Replacement Windows For Rv Pomona, CA
Rv Couch Pomona, CA
Replacement Windows For Campers Pomona, CA
Rv Dinette Table Pomona, CA
Rv Replacement Furniture Pomona, CA
Rv Dining Table Pomona, CA
Motorhome Carpets Pomona, CA
Replacement Windows For Campers Pomona, CA
Awnings For Trailers Pomona, CA
Rv Chairs Pomona, CA
Rv Carpet Replacement Pomona, CA
Rv Sofas Pomona, CA
Rv Dinette Booth Pomona, CA
Replace Rv Flooring Pomona, CA
Rv Dinette Booth Pomona, CA
Rv Interior Furniture Pomona, CA
Finding A Good Local Seo Marketing Pomona, CA
Local Seo For Law Firms Pomona, CA
OCRV Center
Table of Contents
- – Rv Couch Pomona, CA
- – OCRV Center
- – Rv Microwave Replacement Pomona, CA
- – Rv Sofas Pomona, CA
- – Rv Couch Pomona, CA
- – Rv Dinette Table Pomona, CA
- – Rv Dinette Table Pomona, CA
- – Replace Rv Flooring Pomona, CA
- – Awnings For Trailers Pomona, CA
- – Awnings For Rv Pomona, CA
- – Rv Sofas Pomona, CA
- – Rv Couch Pomona, CA
- – OCRV Center
Latest Posts
Stanton Employee Benefits Brokerage Firms
Los Angeles County Restaurant Kitchen Ventilation
Hood Filter Cleaning South Pasadena
More
Latest Posts
Stanton Employee Benefits Brokerage Firms
Los Angeles County Restaurant Kitchen Ventilation
Hood Filter Cleaning South Pasadena