All Categories
Featured
Table of Contents
- – Lawn Irrigation Companies San Gabriel, CA
- – Pacific Green Landscape Maintenance
- – Lawn Irrigation Companies San Gabriel, CA
- – Landscape Irrigation Repair San Gabriel, CA
- – Irrigation Repair Services San Gabriel, CA
- – Irrigation Systems Installers San Gabriel, CA
- – Irrigation Systems Installers San Gabriel, CA
- – Commercial Irrigation Repair San Gabriel, CA
- – Lawn Sprinkler Companies San Gabriel, CA
- – Installing A Sprinkler System San Gabriel, CA
- – Irrigation System Installers San Gabriel, CA
- – Lawn Irrigation System San Gabriel, CA
- – Irrigation System Installers San Gabriel, CA
- – Sprinkler System Installation San Gabriel, CA
- – Pacific Green Landscape Maintenance
Lawn Irrigation Companies San Gabriel, CA
Pacific Green Landscape Maintenance
6530 Whittier Ave Whittier, CA 90601-3919(562) 203-3567
Pacific Green Landscape Maintenance
Exact same deal: make use of the brush to layer all sides with it. It's quite gooey, however once more attempt not to trickle it on anything you don't desire a blue stain on.
I understand this does not seem like a challenging task, and it's not. I had some of the worst rests of my life during this job since I had tweaked my shoulder in a method that really did not enable me to lay on it.
To install into your piping, the valves I used took some threaded couplings that I snugly secured with some plumbers tape and a couple of tightening twists of my wrench - Landscape Irrigation Repair San Gabriel. I do not have any type of image of the installation, however I made use of the same sealing process to affix the combinings to the rest of my pipe, right where each of my area water lines branched off the primary line
Mine needed to be included throughout the pipeline mount, yet some can lay over your pipeline later. The valves need to be wired to your controller, so I'll reveal you this component currently, but I really did my circuitry besides of my piping was completed. Again, I'm making use of a 10-conductor below ground cord that, when reduced open, has 10 strands of various shades.
Lawn Irrigation Companies San Gabriel, CA
I made black the usual cable and after that just went in "rainbow order" to help me keep my areas directly. The gray and brown cords could be made use of later if I intended to include 2 more zones. And long tale short, the zone 2 wire (red) obstructed as I attempted to put it in, so it really did not link fully.
Instead than buy a replacement controller, I simply bypassed Zone # 2. That implies I'm using Zone # 1, then Zones # 3-7 to regulate my 6 areas.
At each shutoff, I needed to link among the vavle's red wires to the black (typical) wire and the other to the shade that would certainly manage that zone (this would certainly be my Zone # 5, so I made use of eco-friendly to refer the electrical wiring at the controller). This would essentially be completion of the line for the green cable, considering that it's not required on the valves further down the line.
Landscape Irrigation Repair San Gabriel, CA
Very same goes with the black typical cord, which is why you see 2 black strands going right into the wirecap envisioned above. In retrospect, I possibly could've figured out a method to not reduce every one of the shades at each valve and simply extract the colors required which would've conserved whole lots of time.
By the last valve the only strands left were the Zone # 1 color (pink), the usual (black), and my two extra colors (gray and brown). I proceeded my extra shades throughout the thing so that I might include a brand-new area at any point within the system without having to rebury an entire new line.
Irrigation Repair Services San Gabriel, CA
programs virtually what I was aiming for, based upon what I had actually seen on other residences in the area. The only point disappointed is also a blowout, which is a pipeline that stands out from the primary line that continues to be capped all year, until the fall when you need to winterize your system (aka, obtain all the water out of the lines so they don't ice up and bust things up).
Right here's what mine looked like at one point sorry my only image is from when I had actually taped off the heartburn gadget in order to spray the subjected PVC brownish to blend in with its natural surroundings. You can see my blowout there on the lower. Spoiler alert: there are some errors below, yet I'll obtain there in a min.
Irrigation Systems Installers San Gabriel, CA
Their pipe was copper, so I needed to get a special SharkBite coupling that would attach copper to PVC. The link had to do with 2.5 feet in the ground, which made it very hard to work with and after a pair attempts, I simply couldn't get the lines to connect without leaking.
The following guy ultimately obtained it, and identified there was a gash on the bottom of the area's pipe (which none people could see) and it wasn't up until he cut that component of the copper pipe off did we obtain a leak-free connection. It was extremely irritating and cost us regarding $150 to fix.
Irrigation Systems Installers San Gabriel, CA
I stop working the inspection in 3 different amazing means. I have to dig it back out again.
My point of views of DIYing an irrigation system had actually definitely changed. It took me a couple of hours to reconfigure whatever and now it looks a little something like this.
Commercial Irrigation Repair San Gabriel, CA

I assembled these links wholesale one night on the sofa turning the swing pipeline arm joints right into a pair lots tees, too right into some white elbows that would go at completion of each zone's water line. They were pretty very easy to thread by hand, however after that I stuck a screwdriver ultimately of the gray elbow joint to give me utilize to tighten them a pair extra transforms.
They just twisted on with a little bit of stress. That same evening on the couch I likewise one ready my lawn sprinkler heads in mass (I had 27 in complete, including misters). This meant turning the tiny gray elbows into the rear of every one and mounting red nozzles into every one based on the kind of spray I desired.
It took a shocking quantity of force to keep it from snapping back in (note my white-fingertip grasp). The following day I was able to mount every one of my lawn sprinkler heads to the other end of the funny pipe, sufficing to the desired length to make sure that I can place my lawn sprinkler head precisely where I wanted it in the ground.
You want it low enough that you won't catch your lawn mower blade on them. It was time to go to each head and established the spray arc. I will not enter the information of this (simply follow your producer's instructions) yet it did include some even more yanking keeping that special key device, so I'm not going to claim it was quick and simple (I would certainly best explain it as laborious, specifically given that we have 27 lawn sprinkler heads!).
Lawn Sprinkler Companies San Gabriel, CA
The last few steps were, for one, filling out all the openings and trenches that had crisscrossed our yard for 3 weeks. Many thanks to some heavy rainfalls in there eventually, my dust stacks had actually turned right into dried out, sloppy clumps so it took a little effort to obtain every little thing filled in, yet we at some point obtained it done.
I'll take all the great information I can obtain! Between the barrage of missteps, the tedious physical exertion, and the general anxiety I put myself under throughout this task it will go down in background as the DIY job I most regret not working with out (and I possibly wouldn't recommend to anybody unless they have a smaller lawn or even more previous plumbing/irrigation experience).
Installing A Sprinkler System San Gabriel, CA
That's not working continuous on it for that time duration, certainly, yet still a lot longer than the 2 or 3 days my next-door neighbor had actually initially forecasted. And I don't condemn him for "obtaining me into this mess" whatsoever. He couldn't have actually anticipated several of the challenges (the slow-to-use trencher, the copper pipe connection, the modifications to the examination needs, and so on) and I'm very happy for his help that initial weekend break.
And that doesn't consist of the truth that I currently know exactly how to winterize it in the late autumn and how to obtain it all set each spring (something that individuals commonly pay $75-$150 a year to have a watering company do). It additionally stands to factor that considering that I understand how the system works, I ought to in theory have the ability to repair points or add onto it needs to I ever require to.
Yep, not the best job I have actually ever done. Maybe I should dip into that financial savings for a massage to attempt to work out that relentless shoulder kink * This blog post includes affiliate links.
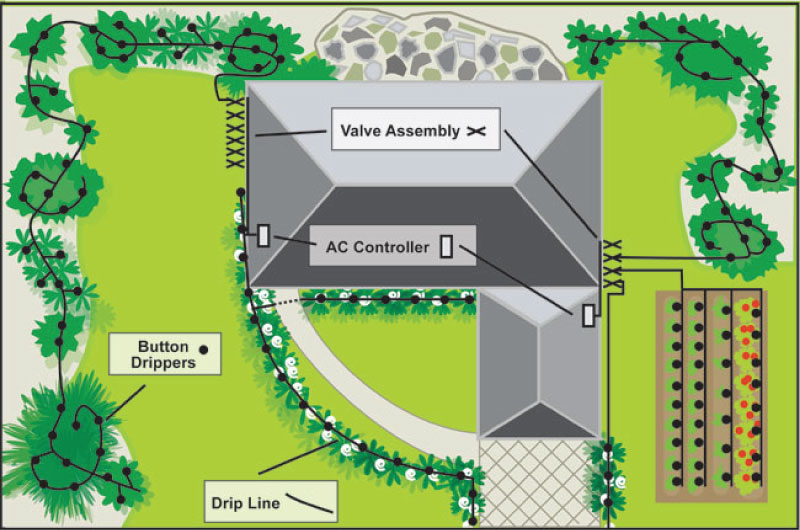
An effective watering requires 2 essential components: the best layout and the appropriate products. An irrigation system is not merely positioning lawn sprinkler heads to just get the landscape wet. It requires to take your particular landscape and property into account. While we are always seeking to offer that lovely green grass, we also want to prevent over saturation of water and waste.
Irrigation System Installers San Gabriel, CA
The Toro Accuracy Spray Nozzles water extra consistently and minimize typical 35% of the water used when contrasted to traditional nozzles. Matched Rainfall All systems are designed with complete head-to-head coverage to provide complete insurance coverage to match rainfall as best as possible Not just are Conserva Irrigation's new lawn sprinkler developed with top of class components, however Conserva Irrigation additionally provides a sector best 5 year warranty on all brand-new systems offered Conserva Irrigation is servicing the system yearly.
You desire to employ a firm that you can rely on. When looking to work with, ask your possible contractors these important questions: Are you insured? If the solution to any of these questions is "no," they might not be the ideal carrier for you.
Lawn Irrigation System San Gabriel, CA
The automatic sprinkler setup process takes time and competence to see to it your new system is exactly what you desire. This is why we take excellent like make certain you are notified concerning every step of your install the whole time the way. Click below to download your New System Install Refine Guide.
Examination Water Pressure: Utilize a stress gauge to examine the water pressure from your resource. This details is essential for picking the ideal parts and guaranteeing your system operates successfully (Landscape Irrigation Repair San Gabriel). Attract a Detailed Plan: Based on your garden's format and plant needs, sketch where pipelines and emitters (sprinklers or drip heads) will certainly go
Prepare for Areas: If your yard has varied plant kinds, think about separating it into irrigation areas. Each zone can be controlled independently to satisfy various watering demands. Contact your neighborhood water authority or house owners' association for any watering system policies and constraints. This action is vital to ensure your system abides by neighborhood standards and to stay clear of potential penalties or required modifications later.
Irrigation System Installers San Gabriel, CA
A watering system is not simply putting sprinkler heads to simply get the landscape wet. While we are always looking to supply that attractive eco-friendly lawn, we likewise desire to prevent over saturation of water and waste.
The Toro Accuracy Spray Nozzles water more consistently and save money on ordinary 35% of the water utilized when contrasted to conventional nozzles. Matched Precipitation All systems are made with full neck and neck insurance coverage to provide complete protection to match rain as best as possible Not just are Conserva Watering's new lawn sprinkler designed with top of class components, yet Conserva Irrigation likewise uses a market best 5 year warranty on all new systems provided Conserva Irrigation is servicing the system yearly.
You desire to work with a firm that you can rely on. When looking to employ, ask your prospective professionals these vital inquiries: Are you guaranteed? If the response to any of these questions is "no," they might not be the best carrier for you.
The sprinkler system setup process takes some time and know-how to make certain your brand-new system is precisely what you desire. This is why we take wonderful care to ensure you are informed concerning every action of your install all along the means. Click listed below to download your New System Install Refine Guide.
Sprinkler System Installation San Gabriel, CA
Test Water Stress: Utilize a pressure scale to check the water stress from your resource. This details is vital for selecting the ideal components and guaranteeing your system runs effectively. Attract an In-depth Strategy: Based on your yard's design and plant needs, sketch where pipes and emitters (lawn sprinklers or drip heads) will go.
Pacific Green Landscape Maintenance
Address: 6530 Whittier Ave Whittier, CA 90601-3919Phone: (562) 203-3567
Email: pacificgreencompany@gmail.com
Pacific Green Landscape Maintenance
Plan for Areas: If your yard has varied plant kinds, consider separating it right into watering areas. This step is critical to guarantee your system abides with neighborhood standards and to stay clear of possible penalties or required modifications later.
Irrigation Maintenance San Gabriel, CAIrrigation System Maintenance San Gabriel, CA
Lawn Irrigation Companies San Gabriel, CA
Sprinkler Systems Near Me San Gabriel, CA
Sprinkler Installer San Gabriel, CA
Irrigation Repair Services San Gabriel, CA
Sprinkler System Installer San Gabriel, CA
Irrigation Installer San Gabriel, CA
Residential Irrigation Repair San Gabriel, CA
Residential Irrigation Repair San Gabriel, CA
Irrigation Systems Installers San Gabriel, CA
Lawn Sprinkler Installers San Gabriel, CA
Sprinkler System Installer San Gabriel, CA
Landscape Irrigation Repair San Gabriel, CA
Lawn Irrigation Services San Gabriel, CA
Irrigation Installers San Gabriel, CA
Irrigation System Installers San Gabriel, CA
Irrigation Repair Services San Gabriel, CA
Residential Irrigation Repair San Gabriel, CA
Sprinkler System Installation San Gabriel, CA
Lawn Irrigation System San Gabriel, CA
Install Sprinkler System San Gabriel, CA
Lawn Sprinkler Installers San Gabriel, CA
Irrigation Service San Gabriel, CA
Sprinkler Installation Companies San Gabriel, CA
Irrigation Installer San Gabriel, CA
Lawn Irrigation Services San Gabriel, CA
Irrigation Installers San Gabriel, CA
Irrigation Repair Services San Gabriel, CA
Lawn Sprinkler Service San Gabriel, CA
Lawn Sprinkler Companies San Gabriel, CA
Commercial Irrigation Services San Gabriel, CA
Sprinkler Installer San Gabriel, CA
Sprinkler System Installation San Gabriel, CA
Irrigation System Installers San Gabriel, CA
Sprinkler Installation Companies San Gabriel, CA
Sprinkler System Installer San Gabriel, CA
Install Sprinkler System San Gabriel, CA
Lawn Sprinkler Service San Gabriel, CA
Sprinkler Installation Companies San Gabriel, CA
Commercial Irrigation Repair San Gabriel, CA
Sprinkler System Installation San Gabriel, CA
Residential Irrigation Repair San Gabriel, CA
Sprinkler System Repairs San Gabriel, CA
Sprinkler Installation Companies San Gabriel, CA
Lawn Sprinkler Companies San Gabriel, CA
Install Sprinkler System San Gabriel, CA
Irrigation Systems Installers San Gabriel, CA
Irrigation Systems Installers San Gabriel, CA
Install Sprinkler System San Gabriel, CA
Irrigation Systems Installers San Gabriel, CA
Irrigation Repair Services San Gabriel, CA
Irrigation Repair Services San Gabriel, CA
Irrigation Installer San Gabriel, CA
Sprinkler Installers San Gabriel, CA
Lawn Irrigation System San Gabriel, CA
Lawn Sprinkler Companies San Gabriel, CA
Irrigation System Repair Service San Gabriel, CA
Irrigation System Installers San Gabriel, CA
Irrigation System Installers San Gabriel, CA
Landscape Irrigation Repair San Gabriel, CA
Sprinkler Systems Near Me San Gabriel, CA
Lawn Sprinkler Repair San Gabriel, CA
Near Me Seo Optimization San Gabriel, CA
Companies Near Me Seo Management San Gabriel, CA
Pacific Green Landscape Maintenance
Table of Contents
- – Lawn Irrigation Companies San Gabriel, CA
- – Pacific Green Landscape Maintenance
- – Lawn Irrigation Companies San Gabriel, CA
- – Landscape Irrigation Repair San Gabriel, CA
- – Irrigation Repair Services San Gabriel, CA
- – Irrigation Systems Installers San Gabriel, CA
- – Irrigation Systems Installers San Gabriel, CA
- – Commercial Irrigation Repair San Gabriel, CA
- – Lawn Sprinkler Companies San Gabriel, CA
- – Installing A Sprinkler System San Gabriel, CA
- – Irrigation System Installers San Gabriel, CA
- – Lawn Irrigation System San Gabriel, CA
- – Irrigation System Installers San Gabriel, CA
- – Sprinkler System Installation San Gabriel, CA
- – Pacific Green Landscape Maintenance
Latest Posts
Fullerton Fleet Repair Services
Website Design Claremont
Web Design Websites Irvine
More
Latest Posts
Fullerton Fleet Repair Services
Website Design Claremont
Web Design Websites Irvine